Baking a pie to block ads-IV
Part 4: Access your Pi-Hole from anywhere!

This is the fourth article in my ongoing series of posts, called Baking a pie to block ads, focused on using a Raspberry Pi to block ads at a DNS level.
Part 1 covers the introduction (to servers, DNS based ad blocking and Raspberry Pis) .
Part 2 walks you through setting up your R-Pi.
Part 3 is about setting up the Pi-Hole on the Raspberry Pi, exploring the dashboard and common settings and configuring your router.
This part is about setting up a VPN on your Raspberry Pi so you can access it from anywhere on your Android or iOS device.
If you have read these and/or are already familiar with these, read on.
What do I do if I want to block ads outside my home network?
Now that you’ve set up the Pi-Hole and all the annoying ads and trackers are being blocked in your home network, and you’re really enjoying it but it’s not enough. You want to use it wherever you go, block ads and trackers on your phone on the move. How do you do that?
The complicated answer involves configuring and opening up your router to the Internet which can open up a whole new can of worms (because of network security, technical issues etc.) so we will go with the simple answer, which is a VPN.
What is a VPN?

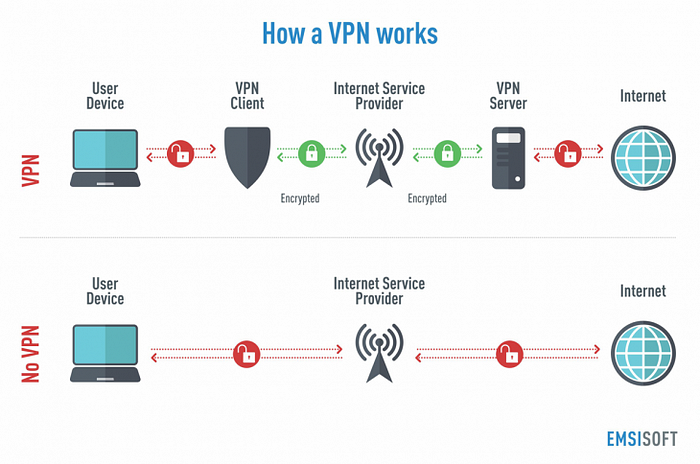
A Virtual Private Network (VPN) is basically a “tunnel” for your internet traffic. Without a VPN, all your internet traffic goes through your ISP and is open to prying eyes (ISPs, Governments, malicious actors etc.) and a VPN basically creates an encrypted tunnel for your traffic and it’s usually safe from third parties trying to snoop on you.
This is one of the uses of a VPN, but it is also used for other purposes like accessing your home/office network which is what we will be doing here (you might be familiar with this if you’re working from home and you have ever needed to log into your office VPN from your home network). If you’re interested, you can read more about VPNs here or watch this insightful video by Tom Scott.
There are multiple ways of setting up a VPN and we’ll be using a service called ZeroTier (I have been using it for some months and it’s pretty reliable and secure). You can follow the instructions here or read on if you want everything in a single place in a slightly easier to understand manner.
Configuring ZeroTier web:
- Create a ZeroTier account. You’ll need this to access your admin console and get a network ID.
- Once done, set up your network by going to my.zerotier.com and click “Create A Network”. A network will be created instantly with the fields network ID, name, description, subnet and nodes. Click on the row which was just created and it will take you to the configuration page for that network.
- There will be multiple sections in the “Settings” area. We’ll change a few things here.
- Under “Basics”, you can change the name of the network to something you can recognize easily (good to do if you’re planning to create multiple networks). Add a description if you want.
- Under “Access Control” in “Basics”, make sure “Private” is checked otherwise anyone can connect to your network which is something we don’t want.
- In the “Advanced” section, under “IPv4 Auto-Assign”, make sure “Auto-Assign from Range” is selected.
Configuring ZeroTier on your Raspberry Pi:
- Download and install ZeroTier on your device. Instructions for installing it on the Raspberry Pi (you can do it via SSH):
curl -s https://install.zerotier.com | sudo bash- Once done, check if everything is working by running:
sudo zerotier-cli statusIt should return something like “200 info [ID] [version] ONLINE” if everything is okay
- To join the network you created in the previous step (web configuration), run the following command in the terminal:
sudo zerotier-cli join [Network ID]- Now to join the network go to your network page: “https://my.zerotier.com/network/[network id]”
- Authenticate your pi by scrolling down to the “Members” section and checking the “Auth?” box.
- Take a note of the assigned IP address under the “Managed IP” section
Configuring ZeroTier on your Android device (might work on iOS as well):
- Download the ZeroTier app from the Google Play Store here or the iOS app store here.
- Open the app and click on the “+” icon on the top right and enter the network ID you created (of which the Raspberry Pi is an authorized member)
- Under the “DNS” tab, go to “Custom DNS” and enter the IP address you noted in the previous section (the assigned IP of the Raspberry Pi)
- Click on “Add Network”
- After a couple of minutes, you should see a new device in the “Members” section of the network you created in the ZeroTier portal.
- Check the box against this new device, give it a name and you’re all set!
- Make sure you don’t check the box saying “Route all traffic through ZeroTier”. This will make sure the traffic is going through your Raspberry Pi only and not through ZeroTier’s servers.
That’s it! Now whenever you want ad/tracker blocking capabilities on your phone wherever you go, just open the ZeroTier app and enable this network connection VPN. Your phone might want you to confirm if you’re okay with this VPN so click yes.
You can add upto 50 members in the free plan of ZeroTier (using the same steps as above by installing and configuring the Android/iOS apps) so you can add your friends and family and introduce them to the world of ad/tracker free browsing.
You can check client level information through the Pi-Hole dashboard and also add custom block lists which will work for all the devices on this network.
This concludes my 4-part series about blocking ads and trackers using a Raspberry Pi.
Couple of things I wanted to call out:
- Not all ads are bad. There are independent creators and publishers who rely on ads on their content to make money so consider adding those publishers/websites as an exception to your Pi Hole.
- The Raspberry Pi Foundation is a UK based charity which is doing exceptional work and enabling people around the world to do even more amazing stuff, so consider donating. This is their official donation page.
As always, constructive feedback and questions are always welcome and stay tuned as there will be a lot more articles here varying across different genres like tutorials, opinions (mostly about tech), knowledge sharing and anything else I feel like sharing :)
